Z animation system functions and extensions to C
Implementation of the systems, files, and other trivia
Z uses C as its scripting language. C is simple, pervasive, efficient, well-known, and has reasonable development environments available. C also has the property that it is very easy to write programs that trash memory somehow; many Z constructs are designed to avoid making dangerous C calls. Z extends C slightly with some constructs for reading and writing multipathfiles, which are the spline format that is used in all Hammerhead tools.
Z works in two modes; there is an interactive mode that displays the results of the script at a given frame, and allows editing of the animation data, and there is the output mode that generates RenderMan RIB output; for input to the RenderMan or any RIB compliant renderer (such as BMRT.)
Z uses the dynamic loading capabilities of Unix. This allows you to edit any of the scripts that make up the animation, and re-load them, without exiting the program. The edited scripts are compiled, linked, and dynamically loaded quickly and efficiently. Only the changed files are re-compiled; so this process typically takes less than a second; giving you the freedom to change his scripts quickly; with other script based systems it is often a slow and cumbersome process to do this; with Z it's a button click.
What's in a name? Well, Z is supposed to be the last letter in animation languages (ba-dum-bump!). But seriously, it's just a nice, short name, easily typed with that letter off in the corner of the keyboard that very seldom sees any action at all.
usage: z [-rib|-obj] script.z [script2.z ...] [-shadow n_shadow] [-o output.rgb]
         [-V x0 y0 x1 y1] [-W x0 y0 x1 y1] [-bg bg_prefix] [-offset bg_frame_offset]
         [-a minframe] [-z maxframe] [-s step] [-c curframe] [-reticle aspect]
         [-still] [-motion_blur blur] [-make_shadows] [-use_shadows]
         [-cache] [-zbuffer] [-extrapolate]
which: runs a script in interactive or batch modeThis is a very terse description, but it's useful to remind you of the options.
where: -rib specifies that a rib file is generated in batch mode
-obj specifies that an OBJ file is generated in batch mode
specifying neither -rib or -obj starts Z in interactive mode
script.z is the name of a z script
script2.z is the name of an optional, secondary script
n_shadow Number of shadowing lights. Required only for -rib
output.rgb is the name of the file that 'render' will generate
x0 y0 x1 y1 is the screen viewport of the animation
x0 y0 x1 y1 is the screen window
bg_prefix is the prefix of a series of frames, or the name
of a single image to animate over
bg_frame_offset is added to each frame number when reading bg
minframe the first frame of the animation
maxframe the last frame of the animation
step the interval between frames of the animation
curframe in batch mode, the frame to be generated
aspect aspect ratio used to draw reticle
-still don't do motion blur
blur amount of motion blur to compute
-make_shadows only compute shadows, then stop rendering
-use_shadows use existing shadow buffers to render
-chache cache all background pictures. Uses lots of memory
-zbuffer when rendering, create output zbuffer instead of image
-extrapolate extrapolate all multipath curves instead of clamping
The -rib flag is used when running Z in batch mode to create the output frames. The rib is printed to standard output, so you would redirect that into a file, or just pipe it into the RenderMan renderer. It's very important that the -rib or -obj flag be first in the list of commands.
The script.z argument is, of course, your animation script. It needs to have the .z suffix. Some have complained that this is to close to the compress(1) suffix of .Z. Life is full of compromises. The script is written in C, with the functions and extensions listed below. You can have as many scripts as you like; they are all linked and loaded together. It is essential, though, that the first script.z has a function name in it that is the same as the name of the script (if it's foo.z, then there must be a function called foo(int ac, char **av) in foo.z). This function is what is called each frame to generate the image for that frame.
The -V and -W commands are unique to Hammerhead, and take a little explanation. The -V command specifies the viewport, that is, the size of the image in pixels. But there are four numbers, not the usual two. Why? Well, we've found that it's very useful to be able to have the origin of a picture not be at 0,0, but be anyplace. So, to specify a 640x480 window, you specify "-V 0 0 639 479".
Unfortunately, this is simple compared to the window parameters. But, fortunately, if the window parameters are left unspecified they default to what are almost always the correct values, so don't worry about it. The only time that these parameters need be specified is if the pixels aren't square or the center of projection is not in the center of the screen. These both are so rare that I won't go into them at this point.
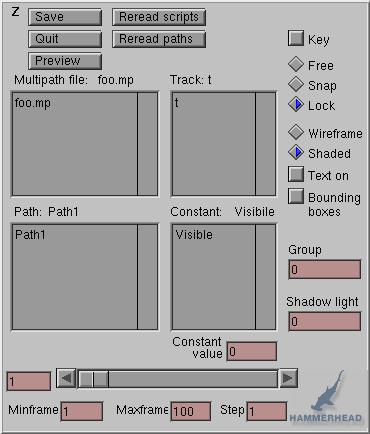 Here is
the main Z interface panel. As your script is processed
for the first time; all the references multipath files are read in and
listed in the first scrolling list. You can choose a path from the
current file by clicking on a path in the second window, and select a
track or constant from that path one of the two scrolling lists in the
second column.
Here is
the main Z interface panel. As your script is processed
for the first time; all the references multipath files are read in and
listed in the first scrolling list. You can choose a path from the
current file by clicking on a path in the second window, and select a
track or constant from that path one of the two scrolling lists in the
second column.
Whenever a path is selected in the main panel, the spreadsheet displays that path; and when a track is selected the graph displays that track over time. The spreadsheet and graph views are described below.
The slider at the bottom of the main panel controls the current frame. As the slider is scrolled, the current frame is changed, and your script is rerun.
After any change to the animation parameters in the graph or the spreadsheet, or if something on the main interface panel changes, your script is executed again. If another change happens before the image is complete, then the partial image is displayed and the computation begins again. This way the computer is always working; and displaying the results as fast as it can.
The Preview button brings up an interface panel to allow preview of the animation. This is similar to the PlayBlast feature in Alias; it computes all the images and saves them, then plays these back in real time.
The Reread scripts button causes Z to examine each of the script files, recompile the ones that have changed, load the compiled objects into memory, and execute the new animation.
The Free/Snap/Lock radio button constrains how the time can be modified in the graph view. In the defaults Lock mode, keys can be modified in value, but not in time. In the Snap mode, the time can be modified to integer frame numbers, while in the Free mode there is no constraint.
The Text on button controls whether the text tags in your script are displayed on the screen. Very commonly, you would create your script so that each object would have a text tag that you could optionally display with this button. This helps you understand what you are seeing in the rendered window.
The Group button sets the group a_group constant in the script. This is traditionally used to render different groups of components of the script. The constant can also be set by the -grp # parameter on the command line.
The Shadow light field sets the current shadow light. What this does is replace the camera transformation with the position, orientation, and field of view angle of the specified shadow casting light. If the value is 0, then the normal camera is used. If it is 1, then the first shadow casting light replaces the camera.
The rest of the buttons and toggles are pretty self explanatory.
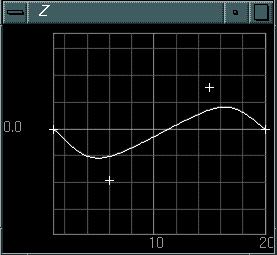 This is the Z
graph view. It shows one track of one path over time. The control
points are shown with '+' marks, and the curve is drawn as a line. Time
goes horizontally across the bottom, and the value is displayed
vertically.
This is the Z
graph view. It shows one track of one path over time. The control
points are shown with '+' marks, and the curve is drawn as a line. Time
goes horizontally across the bottom, and the value is displayed
vertically.
The points can be dragged with the middle mouse button, to edit the animation database. As this happens, the script is rerun, and the results displayed in the animation window. The keys can be moved left and right if the time is not locked in the main interface panel.
There are commands that let you zoom in and out, and pan around the view. These are described by hitting the '?' key in the graph view. You can also change the resolution of the grid, toggle between a line and a spline between the keys, turn on or off the key '+'s.
At this point, you cannot have more than one curve displayed at a time; this is definitely a major limitation that will be resolved in the near future.
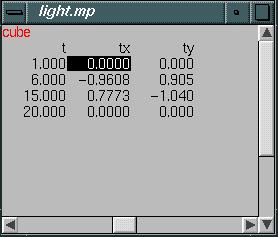 This
is the z spreadsheet. It shows all the animation data. Unlike the graph
view, time here moves downward, as in a traditional animation dope
sheet. The name of the path is shown in red in the upper left corner,
and the tracks are listed horizontally. The format for the floating
point numbers is chosen so that every value in the column can be
displayed nicely, without taking up too much horizontal space.
This
is the z spreadsheet. It shows all the animation data. Unlike the graph
view, time here moves downward, as in a traditional animation dope
sheet. The name of the path is shown in red in the upper left corner,
and the tracks are listed horizontally. The format for the floating
point numbers is chosen so that every value in the column can be
displayed nicely, without taking up too much horizontal space.
The sliders are used, of course, to navigate around the spreadsheet. The path and track headers are always displayed, even if you scroll down the page a long way.
When a path and track are chosen in the main interface panel, the spreadsheet scrolls to show that path and track, and highlights the value that is closest to the current frame.
You can change a value in the spreadsheet in several ways.
box() {
        camera_rotate(0,0,5,0,0,0,45.);
        rotate(X, 30);
        rotate(Y, 30);
        cube();
}
This is a very basic script indeed, that specifies a camera, a couple
of rotations, and a cube. The script needs to be called box.z as
the main routine is called box.
Running "z box.z" brings up the interface panel, the graph (with nothing in it), the spreadsheet (likewise empty) and the animation window, showing a static box. Not very interesting, but it shows that you can do something simple very simply; which is important. More complicated things can be done, of course, as well, as the next example barely begins to illuminate.
voidThis example creates a cone and a cylinder of a specified color and surface description, with an ambient and a point light, and allows them to be moved over time. Note that the "C++" style comments can be used.
light_test(int ac, char **av)
{
float red, grn, blu, ux, uy, uz, intensity;
float amb_int, amb_red, amb_grn, amb_blu, ambient, diffuse, specular, roughness;
float specular_color[3];
// read the multipath to find the color
red = light.mp:color:red;
grn = light.mp:color:grn;
blu = light.mp:color:blu;
color(red, grn, blu);
// position the camera from the light.mp camera path
camera_rotate(light.mp:camera);
// make an ambient light
amb_int = light.mp:ambient:intensity:a_curframe;
amb_red = light.mp:ambient:red:a_curframe;
amb_grn = light.mp:ambient:grn:a_curframe;
amb_blu = light.mp:ambient:blu:a_curframe;
ambient_light(amb_int, amb_red, amb_grn, amb_blu);
// make a point light
intensity = light.mp:light:intensity:a_curframe;
red = light.mp:light:red:a_curframe;
grn = light.mp:light:grn:a_curframe;
blu = light.mp:light:blu:a_curframe;
ux = light.mp:light:ux:a_curframe;
uy = light.mp:light:uy:a_curframe;
uz = light.mp:light:uz:a_curframe;
point_light(intensity, red, grn, blu, ux, uy, uz);
// define a plastic surface
ambient = light.mp:material:ambient:a_curframe;
diffuse = light.mp:material:diffuse:a_curframe;
specular = light.mp:material:specular:a_curframe;
roughness = light.mp:material:roughness:a_curframe;
opacity(.5);
plastic(ambient, diffuse, specular, roughness);
specular_color[0] = specular_color[1] = specular_color[2] = 1;
// position a cone and a cylinder
push();
translate(objects.mp:cone);
rotate(objects.mp:cone);
scale(objects.mp:cone);
scale(4, 4, 4);
cone();
// create a nearby plastic cylinder
translate(0, 0, 1.5);
cylinder();
// specify a text label for the cylinder
text("This is a cylinder");
pop();
}
Multipath files can be referenced easily in Z, with the only extension to the C language that exists. There are three ways of specifying paths, and they are described in the extensions section below.
The push() and pop() routines push and pop the transformation matrix.
Flow of control (if statements, for statements) are just like C, of course, because it is C. Unfortunately, because it is C, there are some bookkeeping details that need to be addressed; namely; you have to declare your variables at the top of the routine.
There are several functions that take either a list of numbers, or a path. While they look similar, there is a dramatic difference: all path specified transformations are motion blurred when output to RenderMan (unless the -still option is specified on the command line).
All parameters with unspecified types take floating point numbers.
polygon(vertex(...), vertex(...), vertex(...), ..., 0)
Create a polygon from a list of vertices. You can have as many points
as you want, and they must be followed by a 0 to mark the end of the
vertex list. Note that this 0 must be an integer (not 0.0).
vertex(x, y, z, [NORMAL, x, y, z, ] [UV, u, v, ] 0)
Create one vertex of a polygon. The NORMAL and UV
parameters are optional. It is critical that any constants specied in
the vertex command be floating point numbers, and that the 0 that marks
the end of the vertex be an integer! You will get a very obscure
error message "ERROR: cannot interpret vertex type" otherwise!
curve(int n, V3F *points, width)
closed_curve(int n, V3F *points, width)
Create a curve. The curve goes through the points specified by the points
array. It is rendered by the RiCurves primitive in RenderMan.
obj("file.obj")
Read in a Wavefront OBJ file.
call_obj(objptr);
Output a obj pointer, one that was read in by OBJ_read()
previously.
text("An informative string")
This renders some text into the interactive window if the Text On
toggle is hit.
Lights are pushed and popped with the PushAttribute and PopAttribute commands, although it is impossible to push and pop shadow casting lights.
ambient_light(intensity, red, grn, blu)
Create an ambient light of the specified intensity and color.
Colors go from 0 to 1.
directional_light(intensity, red, grn, blu, dir_x, dir_y, dir_z)
Create a directional light of the specified intensity and color. The
direction of the light is specified by dir_x, dir_y, and
dir_z.
point_light(intensity, red, grn, blu, px, py, pz);
Create a point light of the specified intensity, color, and position.
spot_light(intensity, red, grn, blu, px, py, pz, tx, ty, tz,
coneangle,
conedeltaangle, beamdistribution);
Create a spot light as described in The RenderMan Companion.
shadow_spot_light(intensity, red, grn, blu, px, py, pz, tx, ty,
tz, coneangle, conedeltaangle, beamdistribution, int xres, int yres)
Create a spot light as above, but casting a shadow. The xres and yres
numbers specify the resolution of the depth map used to cast the
shadows.
plastic(ambient, diffuse, specular, roughness)
plasticRGB(ambient, diffuse, specular, roughness, red, grn, blu)
Define a plastic material with the specified ambient, diffuse, and
specular parameters. The plasticRGB call allows you to specify the
specular colors.
metal(ambient, specular, roughness)
Define a metal material.
matte(ambient, diffuse)
Define a matte material.
constant()
opacity(opacity)
Specify the opacity of a surface. 0 is completely transparent, 1 is
completely opaque.
backface(flag)
If flag is non-zero then backfacing polygons are culled when rendering.
To use a more complicated surface shader, you need to call the surface function, specifying the appropriate shader. For example, to use a texture mapped surface, you can use the Pixar-supplied texmap shader, as follows:
char *texname = "image.tx";
float Ka = .5;
float Kd = .5;
float Ks = .2;
float roughness = .1;
surface("texmap", "texname", &texname, "Ka", &Ka, "Kd", &Kd, "Ks", &Ks, "roughness", &roughness, RI_NULL);
Renderman also requires that you declare the texname shader variable
at the very top of your
main function; as follows:
declare("texname", "uniform string");
The error message that results from not declaring your shader variables is "Segmentation fault (core dumped)", which is not very helpful. If you see that message, you might check to see if all of your declarations are in order.
See The Renderman Companion for more details on shaders.
translate(tx, ty, tz)
translate(filename.mp:pathname)
translate2(tx, ty, tz, tx2, ty2, tz2)
Add a translation to the current transformation. The space is
right-handed, which means that the positive Z axis comes out of the
screen. If the second form of the translate command is used, then the
translation is motion blurred. If the translate2 command is
used, then the two positions are used at the beginning and ending of
the frame interval, to compute motion blur.
rotate(axis, angle)
rotate(filename.mp:pathname)
rotate2(axis, angle, angle2)
Add a rotation to the current transformation. The axis is one of X,Y,
or Z, and the angle is in degrees. Rotations are right handed
around the positive axis. If the multipath form of the
transformation is used, then three rotations are done in the Y,X,Z
order, using the ry, rx, and rz tracks of the path.
scale(sx, sy, sz)
scale(filename.mp:pathname)
scale2(sx, sy, sz, sx2, sy2, sz2)
Add a scale to the current transformation.
transform(filename.mp:pathname)
This does a translation, rotation, and scale using the tx, ty, tz, rx,
ry, rz, sx, sy, and sz tracks of the specified path.
transform_matrix(MX4F mat)
This concatenates a 4x4 matrix to the current transformation. Setting
the values in this matrix to reasonable values is usually done with the
MX4F functions found in /usr/hammerhead/include/mx.h.
push()
pop()
Push and pop the current transformation matrix.
pushAttribute()
popAttribute()
Push and pop all attributes. This would be all possible attributes of
the scene, including materials, lights, transformations, colors, and so
on. You can have up to 64 levels of attributes.
INTERACTIVE
True if the script is being executed in the interactive mode. This can
be used to do several things.
RIB
True if the script is being executed to generate a RIB file. When
generating RIB files, make sure that all debugging output is printed on stderr,
not stdout, or the debugging information will become part of
the output rib file, and will almost certainly confuse the renderer.
OBJ_MODE
True if the script is being executed to generate an OBJ file. The fact
that this is called OBJ_MODE instead of the more obvious OBJ is due to
the word OBJ already being taken by the OBJ library.
BBOX
True if in BBOX interactive rendering mode.
file.mp:pathname:constant
This construct is used to specify a constant. Each path in a
multipath file can have any number of named constant values associated
with it. This construct can be used on either side of an assignment
statement, so you can change constant values easily within a script. An
example might be something like this:
water.mp:waves:height = water.mp:waves_height + 1;
file.mp:pathname:trackname:frame
This construct is used to evaluate a spline at a particular frame time.
If this appears on the left-hand side of an assignment statement, then a
key is set in the path at the specified frame time.
file.mp:pathname:trackname#index
This construct is used to evaluate or set a spline at a particular
index along the spline. Again, this can occur on either side of an
assignment statement, to either set or read the value of key in a
spline.
clear(file.mp:pathname)
Deletes all of the keys in a spline.
MP_path *MP_file_path(char *source, char *mp_filename, char
*pathname)
This routine returns the path in the given multipath filename. The
first argument should be the name of the script file; you can just set
it to NULL for the time being.
MP_num_points(MP_path *path)
MP_value_read(MP_path *path, int index, char *trackname);
MP_value_write(MP_path *path, int index, char *trackname, float
value);
MP_eval_deriv(MP_path *path, float time_value, char *trackname);
These are a very few of the useful routines in the multipath file
library; and can be accessed to do more complicated things to paths
than are possible with the above routines; although they are harder to
use, and don't have the helpful defaults that the above routines have.
It's very easy to make programs that dump core using the multipath
calls directly; so be careful.
surface
lightSource
attribute
atmosphere
interior
exterior
illuminate
displacement
shadingRate
shadingInterpolation
pixelSamples
pixelVariance
declare
char buf[512];
sprintf(buf, "bend_along_path input.obj output.obj %f",
bend_amount);
system(buf);
obj("output.obj");
This builds a string, calls it with the "system" routine, then reads in the resulting .obj file.
z -rib shark.z -c 33 -o shark.33.rgb -V 0 0 639 479 | render
This will run the script shark.z, output a RIB file, which is then parsed and rendered by RenderMan. The current frame is 33, the output of the rendering will be shark.33.rgb, and the viewport of that image will be 0 0 639 479. The default render output name is ri.rgb and the default viewport is 0 0 681 517 (1/3 of a 2k image)
If you have shadowing lights in your script, you have to tell Z about that when you generate the rib file. If there are three shadowing lights, you have to say something like
z -rib shark.z -c 33 -shadow 3 -o shark.33.rgb | render
You would think that Z would be able to figure this out for itself, sadly, you'd be mistaken. The error message that results when you don't specify the number of shadows is obscure; RenderMan prints the following error message "A08007 RIBParameterList: Unknown parameter identifier: shadowname". If you see this, you know that you've forgotten to specify the -shadow parameter.
z -obj shark.z > shark.obj
When a Z script fails, all is not lost. One of the beauties of using the C language is that the debugger can be used. Just run dbx on the Z executable, then you can examine the program. The script itself isn't loaded until the program is running, so you have to wait until it is loaded to set breakpoints within the script. For example: (user typed commands are in courier, computer responses are in courier italic)
% dbx /usr/hammerhead/bin/z
dbx version 7.1 Dec 3 1996 17:03:19
Executable /usr/hammerhead/bin/z
run swim.z -a 0 -z 149 -s 1 -V 0 0 639 479 -bg water.
Process 15324 (z) started
^C
Interrupt
Process 15324 (z) stopped in signal SIGINT:
(dbx) stop in swim
Process 15324: [3] stop in swim
(dbx) c
process resumes running...when the next frame is rendered we get
[3] Process 15324 (z) stopped at [swim:2 ,0x5008c8]
(dbx)
and then you can list, examine variables, set new breakpoints, whatever you want to debug or examine your script.
What Z does when it starts up, or when you hit the Reload Scripts button is it runs the Z preprocessor, zpp, on the script. This processes all of the colon-separated multipath calls described above and includes the z_user.h header file. Next, cc -M is run on the resulting C program to generate a list of header-file dependencies, and finally make is run, to recompile the script if necessary. Once each of the scripts has had this process done, in turn, then they are all loaded into Z using dlopen.
The Makefile that Z uses is in /usr/hammerhead/lib/Z_Makefile. The program zpp is in /usr/hammerhead/bin, as is Z itself. The z_user.h and z.h header files are in /usr/hammerhead/include
Z
is currently supported only under the Linux operating system, and is
available for use by anybody if requested. Just send me mail at
thad@hammerhead.com