Roto
Hammerhead Productions' roto program is a simple
and
easy to use, yet complete, spline-based rotoscoping program.
We've
used it for hundreds of shots, and our customers have used it for
thousands
more; and it has served us very well.
The program has a spectacular unique feature, in that it generates
motion-blurred
rotos. Nothing gives away bad compositing more quickly, to me, than
hard-edges
strobing elements. Some rotoscoping programs allow the user to specify
the region of blur along the edge, but this program computes the
correct
motion blur automatically; usually yielding very clean, seamless
composites.
The basic theme of this program is that the user creates keyframes
of
spline curves that define a region of the image, and the program cuts
these
regions, or elements, off the background. The result is either an
RGBA image, an alpha-only image, or just the curves themselves.
Here's the complete usage message for the program, although most
often
the program is simply invoked as roto You can always
get a copy of the current usage message by typing "roto -"
usage:
roto roto.mp [-source prefix] [-o output_prefix ] [-a minframe -z
maxframe -s step]
[-V
# # # #] [-cineon] [-tiff] [-track track.mp] [-reticle x0 y0 x1 y1]
which: edits roto paths and calculates roto images
where:
prefix is the root name
of the raster images
roto.mp is the multipath file
that stores track information
output_prefix
specifies the output prefix, for batch computation
-tiff output tiff
files, rather than SGI files
-cineon output cineon files,
rather than SGI files
track.mp 2D tracking file generated
by ras_track
x0 y0 x1
y1 reticle corners. Toggle reticle with '[' key
Licensing
We now use Hammerhead's own public-key based licensing scheme for
roto. The first time you run it, it prints the hh_id number for
your machine. Sending that to 'thad' at 'hammerhead.com' will
cause a key to be sent back to you. The numbers in the key should
be put in the file /usr/hammerhead/license/roto_key
Image controls
The current frame is always displayed. It can be panned and zoomed
with
the following commands.
- spacebar-middle-mouse - this pans the image.
- F1 - reset the view to the original size, with the lower-left
corner
in the lower-left corner of the window.
- F2 - zoom in by a factor of two around the mouse position.
- F3 - zoom out by a factor of two around the mouse position.
- F4 - reset the size of the window to fit the image
- F8 - choose an anamorphic view, scaled by two horizontally
Main Panel
The roto program has a familiar looking graphic user interface of
buttons,
sliders, radio buttons, and text input areas. This main panel is
displayed
at all times, and is the principal interface to the program.
 Typically,
as the
program is run, you will go to the first frame of the sequence, and
create
a new path with the New button. A path is a
spline
curve drawn over the image, and is the basic component of the roto
program.
A path has a name, and has keys at various frames throughout the
sequence.
A path is made up of control points, these define and
control
the shape of the curve. Once the New button is selected,
the
user indicates points along the edge that they want to rotoscope by
repeatedly
hitting the left mouse button. It takes a little time and judgment to
determine
how many points are required to define an accurate edge; more points
are
better, but they take time to create, and make the subsequent frames
harder
to create.
Typically,
as the
program is run, you will go to the first frame of the sequence, and
create
a new path with the New button. A path is a
spline
curve drawn over the image, and is the basic component of the roto
program.
A path has a name, and has keys at various frames throughout the
sequence.
A path is made up of control points, these define and
control
the shape of the curve. Once the New button is selected,
the
user indicates points along the edge that they want to rotoscope by
repeatedly
hitting the left mouse button. It takes a little time and judgment to
determine
how many points are required to define an accurate edge; more points
are
better, but they take time to create, and make the subsequent frames
harder
to create.
Point can be moved at any time with the middle-mouse button. The
mnemonic
I use is "mmmiddle - mmmmove". Points can be moved while
in the middle of creating a path, just go back and move them with the
middle-mouse
button. The whole path can be moved by holding the shift key, and
dragging
with the middle mouse button.
Once a path is created, it's name can be changed simply by editing
the
Path text-input field. The names in the Path names field
are sorted in alphabetical order.
The radio button under the Path field contains entries for
- New - create a new path
- Pick - pick a path on the screen with the left-mouse button
- Rotate - rotate the current path
- Scale - scale the current path
- Interval - select an sub-interval of the current path for future
operations
The Pick button allows the user to select a path from the
screen.
The Pick mode is the default mode that the program returns to in many
cases;
for instance, after deleting the current path.
The Rotate button causes a rotate center to appear. Hitting
the
left-mouse button on the center allows you to drag the rotate center to
a new position, hitting anywhere else causes the current path to rotate
around that center.
The Scale button displays a scale handlebox around the
current
path. You can drag on the arrows or corners of the box to rescale the
path.
Holding the Shift key down causes the path to be scaled
proportionally.
The Interval.. button displays the Interval
panel.
The Resample... button displays the Resample
panel, allowing the current path or interval to be subdivided into
more or fewer points.
The Delete button deletes the current path. This is
undo-able,
but still, be careful with it!
The Undo button undoes the last supported operation.
Almost
everything is undo-able, except for Save and a few other operations.
Still,
only one level of undo is supported, so be careful. Particularly useful
is undoing the movement of a path, when you intended to pan the image.
The Subview... button
displays
the Subviewport panel, allowing you to specify just a small portion of
the image. Only this small part is read from disk too; which can be
dramatically
faster than reading the whole image.
The Save... button saves the data file.
The Preview... button
displays the
Preview panel, enabling real-time
display
of the roto curves or regions.
The Quit button quits the program. If you haven't saved since
you made a change, it prompts you to do so.
The Generate...
button displays the Generate panel,
enabling
the calculation of the roto'd images.
The Key toggle specifies whether the current frame is a key
for
the current path. Toggling this on causes the current path to have a
key
interpolated and created at the current frame. Toggling this off
destroys
the key, and the path reverts to the interpolated position based on the
keys around it. If this is done by accident, the Undo button
will
put the key back.
The Interior button specifies that the current path is a hole, not
part
of the region. Any path can be an interior path, and these cut holes in
the regions defined by the other paths. Interior paths are drawn as
dotted
lines in the raster window.
The Closed button specifies that the current path is closed.
Now, probably all paths should be closed; and it's a common technique
when
using the program to add points, one after the other, until done; then
hit the Closed button to terminate the path. The roto program is
used at Hammerhead for input to a wide variety of other tools (such as
wire-removal, and line drawing) that don't need closed paths, so that
is
why there is an option for them to not be closed. If you don't specify
them as closed in roto, when it becomes time to generate the
roto
region; a straight line will be used to connect the endpoints of the
curve.
The Break button specifies whether the current point is a
break
point or not. If it is a break point, then the curve is not
smooth
through that point; but can change directions abruptly. Also, path
types
(defined immediately below) are define between break points.
The Point type radio buttons have four possibilities:
- Bezier
- Linear
- Pblend
- Bspline
Bezier curves are by far the most complicated and general curve
types.
A bezier curve has a position, and tangent specification at each
control
point. Personally, I find them confusing.
Linear curves are piece-wise straight lines.
Pblend curves are also called Catmull-Rom or Cardinal splines,
depending
on what college you went to. They are interpolating cubic curves; that
is, they go through the control points. They occasionally overshoot the
control points (an inherent problem with interpolating curves) but are
reasonably easy to control.
Bspline curves are my personal favorite. They do not
interpolate
the control points, but are very smooth.
For both Pblend and Bspline curves, the only control you have over
the
sharpness of a corner is how close together you place the control
points.
The Show radio buttons has three possibilities:
The Image mode is by far the most common mode. It displays the
original
image, with the paths drawn on top of it. The Matte mode displays a
black-and-white
image of the computed roto regions. The Roto mode displays the Matte
image
multiplied by the original image, over an optional background.
Both
the Matte and Roto modes are reasonably slow, as they have to render
the
mattes before the images are displayed. While they are rendering, the
title
of the window reflects what is happening.
The Blur slider determines the amount of blur that a path
has.
Each path can have a different amount of blur; this is typically
done in a case where you are roto-ing a person. The hair might have a
blur
of 5, where the rest of the body might have a blur of 2. The blur gives
a softness to the matte, sometimes helping the image fit into the
background
more smoothly. The blur can be either Out, Mid, or In.
In the Mid case, the default, the blur is centered on the path; where
in
the Out case the blur is outside the path, and in the In case it is
inside
the path. These blurs are all computed by blurring the matte; so
sometimes
thin features don't look like you want them to. It takes practice with
the program to get everything exactly like you want.
The Key double-arrow buttons change the frame to be the
previous
or next key for the current path.
The Frame slider allows selection of the current frame. The
arrow
keys advance one frame at a time (this can be painful if the pictures
are
large) and the text-input field allows direct typing of the frame
number.
The Motion blur... button
displays
the Motion blur panel. This enables a unique feature of the Hammerhead
roto program; motion blurred rotos.
The Step double arrow keys advance a specified number of
frames.
This is useful to step through a sequence in large jumps, then
refining
the roto inbetween these keys on a second, and then a third pass.
The Logo shows you what company made the software; just in
case
you ever forget.
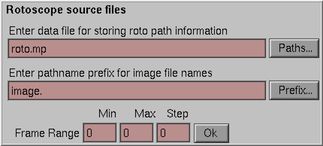
Source panel
 When
the program is started with no arguments, it displays the source panel.
In this panel, you have to type the name of the data file to store the
curves, and the prefix of the images.
When
the program is started with no arguments, it displays the source panel.
In this panel, you have to type the name of the data file to store the
curves, and the prefix of the images.
Traditionally, we use the .mp (for multipath)
extension
for our datafiles; specifying that there are multiple paths, of
potential
different types, within the datafile. The file is a binary file,
for compactness and speed; although there are programs to print it out.
The library is available with the roto program, so that you can
write
your own programs to interpret and edit the multipath files.
The image prefix typically has a dot at the end. For example, if the
names of your files are hero.1.rgb, hero.2.rgb, ..., hero.39.rgb then
the prefix would be hero. and not simply hero
Each of these text entry fields has a browser, so that you can
search
for the datafile or images. When selecting an image prefix with the
browser,
simply click on any of the frame names; the browser will extract the
prefix
from the full name.
The frame range is specified in the lower text-entry fields.
A very common usage of the source panel is the following. Say you've
created a multipath file containing the roto of a sequence; called hero.mp.
You can re-start roto now simply by typing
% roto hero.mp
But, now say that you want to apply those roto curves to a different
sequence of frames. Just type
% roto
Then type hero.mp into the paths field, and type the new prefix into
the Prefix field, and you'll be all set.
Interval panel
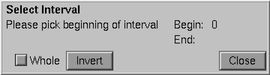
The interval panel allows selection of a sub-interval of the current
curve. This sub-interval can be moved (with the shift-middle-mouse
combination),
scaled, rotated, or resampled.
Simply point to the beginning and end of the sequence once the
interval
panel appears. Sometimes you'll get the order backwards (well,
sometimes
the program does; it's hard to lay blame here!) but hitting the Invert
button will select the other half.
Hitting the Whole button selects the whole curve once again.
Resample panel
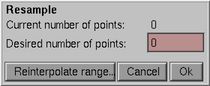 The
Resample panel allows the number of points in a path or a sub-interval
to be changed. Typically this is done when, once you go to a
later
frame, you find that you need more detail than you thought at first.
Select
the interval that needs more detail with the Interval
panel, then choose a new number of points and hit Ok.
The
Resample panel allows the number of points in a path or a sub-interval
to be changed. Typically this is done when, once you go to a
later
frame, you find that you need more detail than you thought at first.
Select
the interval that needs more detail with the Interval
panel, then choose a new number of points and hit Ok.
The Reinterpolate range... button
is used to re-interpolate keys between two keys.
Reinterpolate range panel
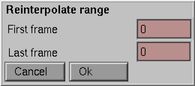 The
Reinterpolate range panel is used to re-interpolate keys in a region of
frames. Sometimes you really want to start all over, and decide to do
things
differently. You can force a set of keys to be interpolated linearly
from
between two frame ranges with this panel. Simply type the first and
last
frame numbers of the frame interval to be reinterpolated, and hit Ok.
The
Reinterpolate range panel is used to re-interpolate keys in a region of
frames. Sometimes you really want to start all over, and decide to do
things
differently. You can force a set of keys to be interpolated linearly
from
between two frame ranges with this panel. Simply type the first and
last
frame numbers of the frame interval to be reinterpolated, and hit Ok.
Generate panel
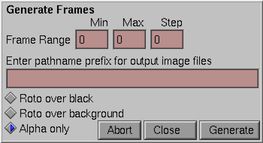 The
Generate Panel creates the images. You need to specify the frame range,
the prefix for the created paths, and whether to render them over
black,
over the background, or as alpha
only (single-channel)
images.
The
Generate Panel creates the images. You need to specify the frame range,
the prefix for the created paths, and whether to render them over
black,
over the background, or as alpha
only (single-channel)
images.
Background panel
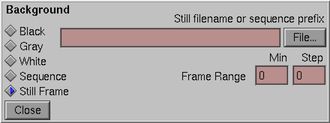 The
roto program can generate the roto images over a background. By
default,
it uses a black background, but you can specify it as gray or white as
well. Alternatively; you can specify an image, or a sequence of images.
If you specify a sequence, the program will do the composite internally
when the roto button is hit, and show you what the final
composite
will look like.
The
roto program can generate the roto images over a background. By
default,
it uses a black background, but you can specify it as gray or white as
well. Alternatively; you can specify an image, or a sequence of images.
If you specify a sequence, the program will do the composite internally
when the roto button is hit, and show you what the final
composite
will look like.
Occasionally the background command will not take effect
immediately...I'm
working on that.
Motion blur panel
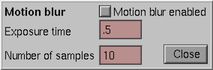 This
program optionally generates motion-blurred rotos. The roto
program
generates motion-blurred mattes by rendering many sub-frames, and
averaging
them together.
This
program optionally generates motion-blurred rotos. The roto
program
generates motion-blurred mattes by rendering many sub-frames, and
averaging
them together.
The Exposure time is the length of time that the image is
blurred.
.5, the default means that it's blurred over one-half of a frame time.
This is almost certainly the correct value to use (Most movie cameras
use
180 degree shutters, exposing the film for one-half of the frame time)
The Number of samples determines how many sub-frames are
rendered.
More is better, but takes longer. If you can see distinct double-images
in the mattes that are generated, you probably need to increase this
value.
Typically the Motion blur enabled button is left off during
development,
because it slows down rendering so much. It is easy to forget to
re-enable
it before generating the rotos...try not to do that!
Preview panel
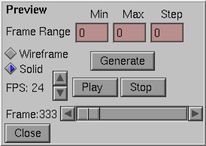 The
preview panel allows you to display the roto over time. It generates
either
line-drawings or rendered black-and-white 1-bit images, and then plays
them back in real time.
The
preview panel allows you to display the roto over time. It generates
either
line-drawings or rendered black-and-white 1-bit images, and then plays
them back in real time.
The Wireframe/Solid radio button indicates whether you want
line
drawings or filled regions. The line drawings are faster, and
somewhat
cleaner; in that the filled regions are dithered to one-bit images and
get a little ratty along the edge.
The FPS buttons change the speed of playback. The program
assumes
that your screen is running at 72 Hz, if it is running at a different
rate
than the playback speed will be slightly off.
The Generate button starts generation of the flipbook, once
it
is done, you can hit the Play button to play back the animation.
Subviewport panel
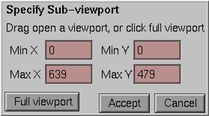 You
can specify a subviewport to read and display. This can be much
faster
than reading and displaying the whole image, especially for film size
images.
You
can specify a subviewport to read and display. This can be much
faster
than reading and displaying the whole image, especially for film size
images.
And that's it! Again, we've found this program to be fun, fast, easy
to learn and to teach. I could have a whole section on compositing
philosophy
here; but let me just say that we find hand rotoscoping to be cheaper
and
better than blue-screen compositing in almost all circumstances. Think
about it...
Hotkey summary
There are a few hot-keys in roto, used to speed up some
operations. These are listed below.
- k - Toggle a key for the
current path at this frame. If there is a key, it is
deleted. If there is no key, one is created
- b - Toggle the 'break'
flag at the nearby point in the current path. This allows two
things, the roto curve can have a sharp turn at that point, and the
type of interpolation can change at that point.
- s - Turn on 'scale' mode
- r - Turn on 'rotate' mode
- p - Turn on 'pick' mode,
the normal mode for picking curves and moving points
- i - Turn on 'interval'
mode
- w - Secret button to
write out the multipath file, without having to click on 'Save'
- c - copy the current
curve at the current frame, used with 'v'
- v - paste the saved curve
at the current frame
- h - toggle whether points
are hidden. This is probably not really very useful, unless you
are using roto to make line-drawn artwork.
- R - just show the red
channel
- G - just show the green
channel
- B - just show the blue
channel
- C or c - show the image in color
- [ or ] - toggle the reticle
- Numeric keypad - nudge
the current point (or whole path, if SHIFT key is depressed) one pixel.
- <- go back one frame,
or if CONTROL is pressed go back by STEP amount, or if SHIFT is pressed
go to previous key
- -> go to next frame,
or if CONTROL is pressed go forward by STEP amount, or if SHIFT is
pressed go to next key
Return to Hammerhead Productionshome
page.